Angular Interview Questions and Answers: Review what you know, especially if you have an Angular interview coming up. Refresh your knowledge!
More...
As an IT professional, you understand the importance of staying up to date with the latest technologies and honing your skills. With Angular being a widely-used front-end framework, it's crucial to have a deep understanding of its core concepts and best practices. Preparing for an Angular interview can help you not only land your dream job but also reinforce your knowledge and expertise in this popular framework. Refresh your knowledge using our Angular Interview Questions and Answers blog post!
In this article, we've compiled a comprehensive list of Angular interview questions and answers that cover a wide range of topics. These questions and answers touch on Angular fundamentals, component interactions, dependency injection, and many more essential concepts. Whether you're a seasoned developer or just starting your journey with the Angular framework, these questions are designed to help you prepare for any interview scenario.
By reviewing and practicing these Angular interview questions, you will gain a thorough understanding of various aspects of the framework, from testing and state management to performance optimization and coding standards. Moreover, this article serves as an excellent resource for both interviewees and interviewers, ensuring a comprehensive and effective evaluation of Angular skills.
Without further ado, let's check out these Angular interview questions and answers and strengthen your foundation in this powerful front-end framework. Happy learning and good luck in your next interview!
Angular Interview Questions and Answers Topics
Angular Fundamentals
Welcome to the section focused on Angular interview questions and answers.
We'll check out a range of topics, from understanding the key differences between AngularJS and Angular, to exploring Angular framework's bootstrapping process and the creation of custom components. We'll also talk about Angular's data binding capabilities, the role of directives and pipes, and the concept of Single Page Applications (SPA).
Let's get started and unravel the intricacies of Angular together!
1. AngularJS or Angular? Explain the differences.
AngularJS, the first version of Angular, is a JavaScript-based open-source framework for creating dynamic web applications.
Angular, often referred to as "Angular 2+" or simply "Angular," is a complete rewrite of AngularJS, addressing many of its limitations and introducing new features.
Angular is a powerful platform for building scalable and maintainable web applications using TypeScript. The rewrite improved performance, added mobile device support, introduced a more intuitive component-based architecture, and implemented better practices for modern web development.
2. Can you explain the role of NgModule and its various properties, such as declarations, imports, exports, and providers?
NgModule is a fundamental building block in Angular applications, used to organize and manage related code. It has several properties:
declarations: Used to declare components, directives, and pipes that belong to the module.
imports: Imports other modules and their exported components, directives, and pipes for use within this module.
exports: Makes components, directives, and pipes available for other modules to import and use.
providers: Registers services for dependency injection, making them available throughout the application.
3. What is the purpose of Angular's bootstrapping process, and how does it work?
Angular's bootstrapping process initializes the application, setting up the environment and components required to run it.
Bootstrapping begins by launching the main module, typically AppModule. The AppModule specifies the root component (usually AppComponent) to be loaded as the starting point. Angular then compiles the components, resolves dependencies, and initializes the application by creating an instance of the root component and inserting it into the DOM.
4. How do you create a custom component in Angular, and what are the essential parts of a component?
To create a custom component in Angular, follow these steps:
a. Import the Component class from the '@angular/core' package.
b. Create a class that extends the Component class.
c. Use the @Component decorator to provide metadata such as selector, template, and styleUrls.
d. Implement the desired component logic in the class.
The essential parts of a component are:
a. The class itself, containing the component's logic.
b. The @Component decorator, specifying metadata.
c. A template, defining the component's HTML structure.
d. CSS styles (optional), styling the component.
5. Can you explain the role of component lifecycle hooks and provide examples of when to use them?
Component lifecycle hooks are methods that get called at specific points during a component's lifecycle, allowing you to perform actions at those times. Examples include:
ngOnInit: Called after Angular initializes the component's data-bound properties, often used for initialization logic.
ngOnChanges: Called when Angular detects changes to input properties, allowing you to react to those changes.
ngDoCheck: Called during every change detection run, allowing you to implement custom change detection.
ngOnDestroy: Called just before Angular destroys the component, allowing you to perform cleanup tasks.
6. What is the difference between a structural directive and an attribute directive?
Structural directives modify the DOM structure through the addition, removal, or manipulation of elements.
Some examples of structural directives are *ngFor and *ngIf, while some examples of attribute directives are NgStyle and NgClass.
7. How do you conditionally apply CSS classes to elements in Angular templates?
To conditionally apply CSS classes in Angular templates, use the [ngClass] directive. It accepts an object where the keys are the class names, and the values are expressions evaluating to true or false, determining whether the class is applied. For example: <div [ngClass]="{'active': isActive, 'disabled': isDisabled}"></div>.
8. What are pipes, and how can you create a custom pipe in Angular?
Pipes are a way to transform data in Angular templates. They take an input value and apply a transformation, returning a new value. To create a custom pipe, follow these steps:
1. Import the Pipe and PipeTransform classes from @angular/core.
2. Create a class implementing the PipeTransform interface.
3. Use the @Pipe decorator to provide metadata, such as the pipe's name.
4. Implement the transform method in the class.
9. How does Angular handle data binding, and what are the different types of data binding?
Data binding in Angular is the synchronization between the template (view) and the component (model). It allows for automatic updates between the view and the model whenever either changes. In Angular there are several types of data binding:
1. Interpolation: Uses double curly braces {{ }} to display a component property value in the template.
2. Property binding: Binds a DOM property to a component property using square brackets [ ] syntax.
3. Event binding: Binds a DOM event to a component method using parentheses ( ) syntax.
4. Two-way binding: Combines property and event binding to allow data flow in both directions, often used with the [(ngModel)] directive.
10. Can you explain the concept of a Single Page Application (SPA) and how Angular supports this paradigm?
A Single Page Application (SPA) is a web application that loads a single HTML page and dynamically updates its content as users interact with the app.
The main advantages of SPAs include better user experience, faster loading times, and simplified development.
Angular supports the SPA paradigm by providing a component-based architecture, handling client-side navigation with the Angular Router, and offering efficient change detection and data binding.
This allows developers to build scalable, maintainable, and performant SPAs with ease.
Component Interaction
In this section we'll focus on Component Interaction in Angular! From passing data between parent and child components, to notifying parent components of changes, and accessing projected content, we will cover it all. Let's get started with these Angular interview questions and answers and refresh your knowledge abotu component interaction.
11. How do you pass data from a parent component to a child component in Angular?
To pass data from a parent component to a child component in Angular, the @Input() decorator can be used in the child component. In the parent component, the desired data should be bound to the child component's input property using property binding. For example:
In the child component:

In the parent component's template:
12. How can a child component notify its parent component of a change?
A child component can emit an event to notify its parent component of a change using the @Output() decorator and the EventEmitter class. For example:
In the child component:
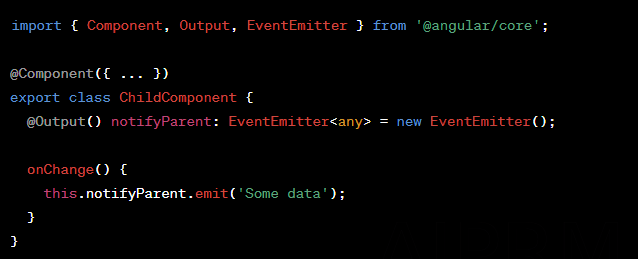
In the parent component's template, listen for the event using event binding:
13. What is the purpose of ViewChild and ViewChildren, and when should you use them?
ViewChild and ViewChildren are used to query and access child elements or components in a component's view. ViewChild returns the first matching element, while ViewChildren returns a QueryList of all matching elements. Use them when you need to interact with child components or elements from within the parent component. For example:
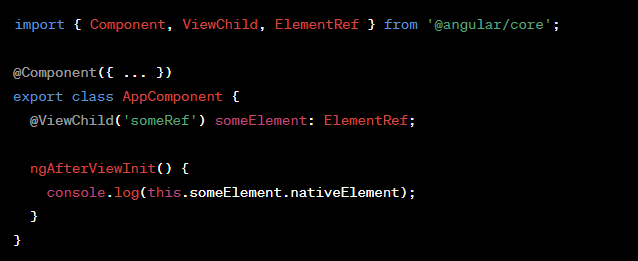
14. How can you use ContentChild and ContentChildren to access content projected into a component?
ContentChild and ContentChildren are used to access content projected into a component using <ng-content>. ContentChild returns the first matching element, while ContentChildren returns a QueryList of all matching elements. For example:
In the custom component:
In the parent component's template:

In the custom component's class:
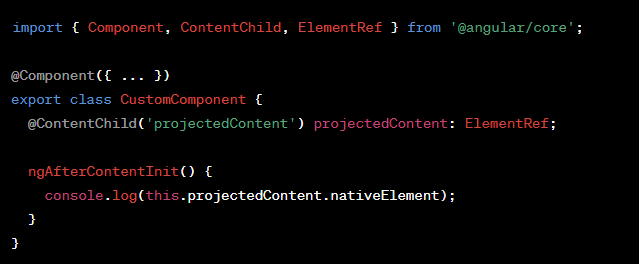
15. What is the difference between ElementRef and TemplateRef, and when should you use each one?
ElementRef and TemplateRef are both used to access elements in the DOM, but they serve different purposes.
ElementRef is a wrapper around a native DOM element. It provides direct access to the underlying DOM API, allowing you to manipulate the element directly. You should use ElementRef when you need to perform direct DOM manipulations, such as setting styles, classes, or attributes.
TemplateRef, on the other hand, is a reference to an embedded template. It enables you to create, update, and manage instances of the template. You should use TemplateRef when you need to instantiate or manipulate templates dynamically.
Use ElementRef cautiously, as direct DOM manipulations can lead to security vulnerabilities and make your application less compatible with Angular's server-side rendering (SSR).
16. How do you create and use a shared service to communicate between unrelated components?
To create a shared service, first, generate a new service using Angular CLI:
Then, in the shared.service.ts file, import the necessary dependencies and create methods for communication:
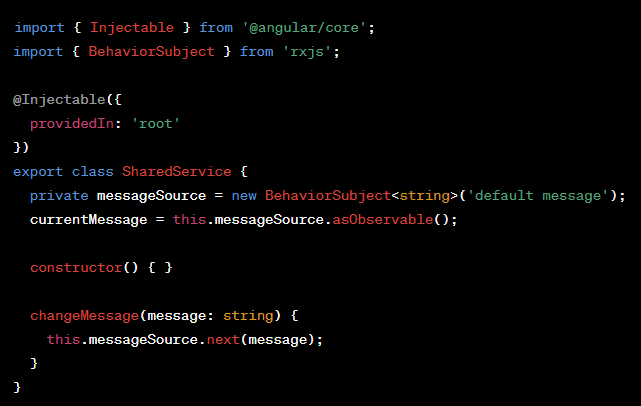
To use the shared service in unrelated components, import the service and inject it into the component's constructor. Then, you can use the service's methods to communicate between the components.
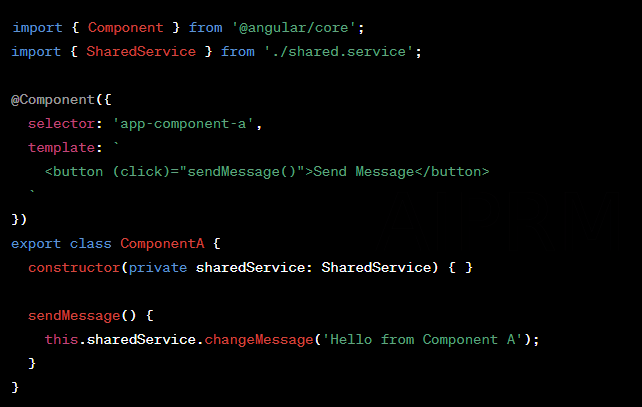
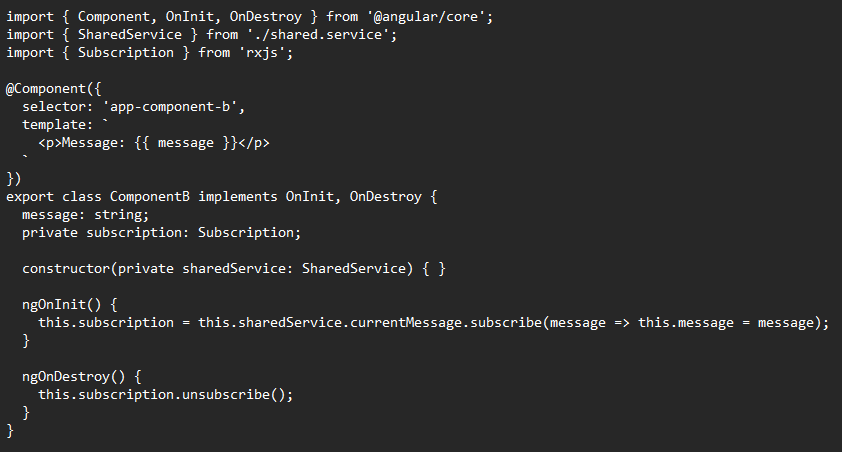
17. Can you provide an example of using a BehaviorSubject for component communication?
A BehaviorSubject is a type of Observable that maintains a current value. It's useful for sharing data between components that don't have a direct parent-child relationship.
Suppose we have a shared service as described in question 6. In a component, you can subscribe to the BehaviorSubject like this:
18. How do you use an Angular template reference variable, and what are its common use cases?
A template reference variable is a way to reference a DOM element or directive within a template. You declare it using the hash (#) symbol followed by a variable name.
Common use cases include:
1. Accessing a DOM element's properties or methods.
2. Accessing a directive's instance and its properties or methods.
Example:

In the component:

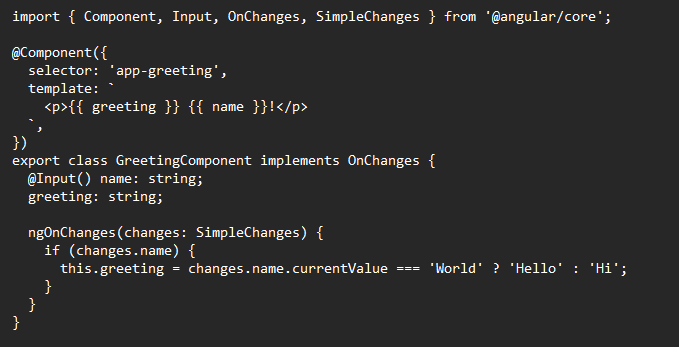
19. What is the purpose of the ngOnChanges lifecycle hook, and when is it called?
ngOnChanges Lifecycle Hook:
The ngOnChanges lifecycle hook is called when Angular detects changes to input properties of a component or directive. It is called once during the component initialization and then whenever one or more input properties change. It receives an object containing the previous and current values of the changed properties.
You can use ngOnChanges to react to changes in input properties, perform calculations, or trigger side effects based on the new values.
Example:
20. How do you use projection and the <ng-content> tag to create reusable components?
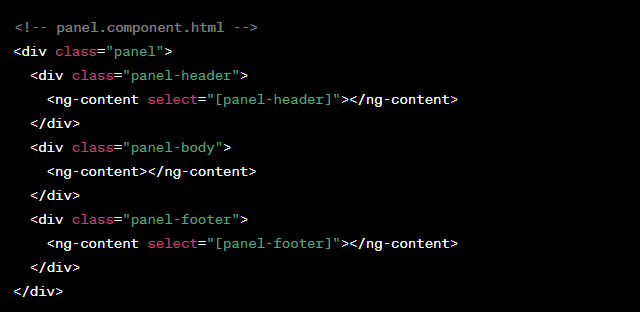
Projection, also known as content projection or transclusion, is a technique in Angular that allows you to create reusable components by inserting content from a parent component into designated slots in a child component.
The <ng-content> tag is used in the child component's template to define where the projected content should be inserted.
Example
Create a reusable panel component:
Then, use the panel component in another component:
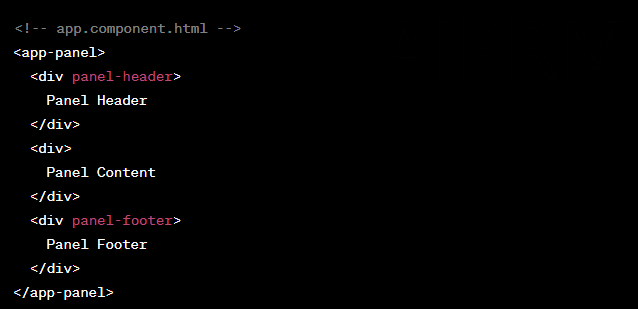
In this example, the content inside the <app-panel> component will be projected into the appropriate slots in the panel component's template, as defined by the <ng-content> tags.
A superheroic origin
Angular was initially developed by Google engineers Misko Hevery and Adam Abrons in 2009. They named their side project "Angular" after the HTML angle brackets (< >) used in Angular templates. Interestingly, the framework's original name was "AngularJS," which was inspired by the superhero theme. The core components of AngularJS were called "Superheroic JavaScript MVW Framework" - MVW stands for "Model-View-Whatever," highlighting the flexibility of the framework.
Dependency Injection
This section is about Angular services, their relationship with dependency injection, and how they can be utilized effectively. We'll also discuss the providedIn property and its impact on a service's scope, as well as the creation of custom injectors to provide dependencies. We'll refresh our knowledge about the hierarchical nature of dependency injection in Angular, various decorators such as @Optional, @Self, and @SkipSelf and their roles in dependency injection. We'll also check out the different approaches for providing dependencies using useClass, useValue, useFactory, and useExisting.
Let's get go through these Angular interview questions and answers about dependency injection!
21. What is dependency injection, and why is it useful in Angular applications?
Dependency Injection (DI) is a design pattern that allows for the decoupling of dependencies between components or classes, promoting modularity, reusability, and maintainability.
In Angular applications, DI is useful because it enables the automatic creation and management of dependencies, making it easier to swap implementations, test components in isolation, and share common services across the application.
22. Can you explain the concept of an Angular service and how it is used for dependency injection?
An Angular service is a class that encapsulates functionality or data that can be shared across multiple components.
Services are used for dependency injection by registering them with the Angular injector, which manages the instantiation and provision of dependencies.
When a component requires a service, the Angular injector injects the appropriate instance, allowing components to remain focused on their core responsibilities and promoting code reusability.
23. What is the providedIn property in a service, and how does it affect the service's scope?
The providedIn property in a service defines where the service will be available in the Angular application. By specifying the scope, developers can control the visibility and lifetime of the service. For example, if providedIn is set to 'root', the service becomes a singleton, available throughout the entire application. Alternatively, setting providedIn to a specific module makes the service available only within that module's scope.
24. How do you create a custom injector and use it to provide a dependency in Angular?
To create a custom injector and use it to provide a dependency in Angular, follow these steps:
1. Import Injector and ReflectiveInjector from @angular/core.
2. Create a custom provider for the desired dependency using the provide and useClass, useValue, useFactory, or useExisting properties.
3. Create a new injector using ReflectiveInjector.create and pass the custom provider(s) as an argument.
4. Retrieve the dependency from the injector by calling injector.get() with the token representing the dependency.
25. How does the hierarchical dependency injection system work in Angular?
The hierarchical dependency injection system in Angular works by creating a tree of injectors that mirrors the component tree.
When a component requests a dependency, Angular first looks for the provider in the component's own injector. If not found, it traverses up the injector tree until it finds a matching provider or reaches the root injector.
This hierarchy allows for the scoping of services and the easy overriding of providers at different levels.
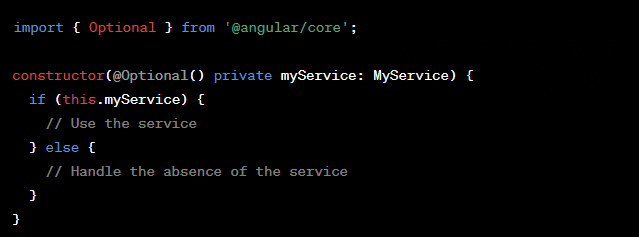
26. Can you provide an example of using the @Optional decorator in Angular dependency injection?
The @Optional decorator is used in Angular dependency injection when a dependency may not always be available. It prevents the DI system from throwing an error if the dependency is not found. Example:
27. What is the purpose of the @Self and @SkipSelf decorators in Angular?
The purpose of the @Self and @SkipSelf decorators in Angular is to modify the dependency lookup behavior:
@Self: Restricts the DI system to only search for the dependency in the component's own injector, preventing it from traversing up the injector tree.
@SkipSelf: Skips the component's own injector and starts the dependency search from the parent injector.
28. How do you use useClass, useValue, useFactory, and useExisting in Angular providers?
useClass, useValue, useFactory, and useExisting are options for Angular providers to specify how a dependency should be resolved:
useClass: Specifies a class that should be instantiated to create the dependency.
useValue: Provides a specific value as the dependency.
useFactory: Specifies a factory function that creates the dependency.
useExisting: Maps the dependency to an existing token, effectively creating an alias.
29. Can you describe a scenario where you would need to create a multi-provider?
A multi-provider scenario arises when you want to inject multiple instances of a service or value that share the same token. This is useful for extending or composing functionality from multiple sources.
To create a multi-provider, use the multi property in the provider configuration:

When injecting the dependency, Angular will provide an array of instances associated with the token:

30. How do you test Angular services that rely on external dependencies?
To test Angular services that rely on external dependencies, you can use the TestBed testing utility to configure a testing module, providing mock implementations or values for the dependencies. This way, you can isolate the service being tested from its external dependencies:
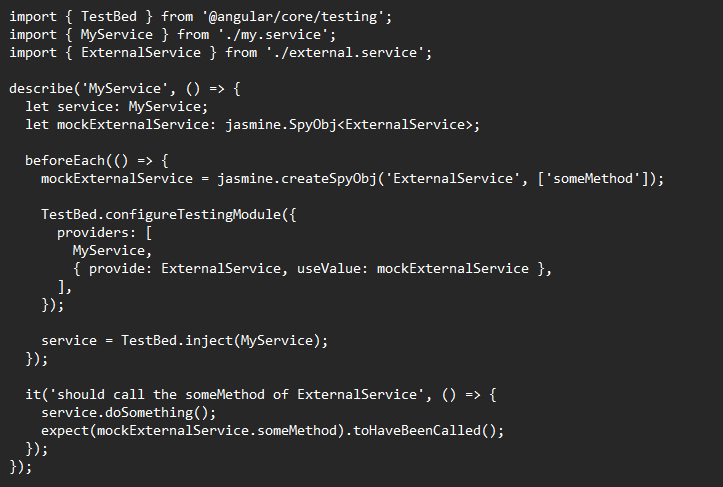
In this example, a mock version of ExternalService is created using Jasmine's createSpyObj utility, and the TestBed is configured to use the mock instead of the real service. This allows you to test MyService in isolation while controlling the behavior of its external dependency.
Routing and Navigation
It is crucial to have a deep understanding of Angular's routing system to build scalable and maintainable applications. In this section, we will explore various aspects of Angular routing, including route configuration, navigation techniques, route guards, nested routes, and much more.
These Angular interview questions and answers are carefully crafted to test your knowledge and help you prepare for your next job interview.
We hope that these Angular interview questions and answers will help you gain a comprehensive understanding of Routing and Navigation in Angular. Good luck with your preparation and your upcoming interviews!
31. How do you configure routes in Angular, and what are the main properties of a route definition?
In Angular, routes are configured using the RouterModule.forRoot() method in the root module, typically app.module.ts, and RouterModule.forChild() in feature modules. The main properties of a route definition are path, component, redirectTo, pathMatch, children, canActivate, canDeactivate, resolve, and data.
32. What is the difference between routerLink and router.navigate in Angular?
routerLink is a directive used in templates to bind a clickable element to a route, while router.navigate() is a method that can be called programmatically in a component's class. Both achieve navigation, but routerLink is declarative and router.navigate() is imperative.
33. How do you handle route parameters and optional route parameters?
Route parameters are captured using a colon (:) in the path property, e.g., path: user/:id. They can be accessed using the ActivatedRoute service's paramMap property. Optional route parameters are specified using a query string and can be accessed using the queryParamMap property of the ActivatedRoute service.
34. Can you explain the concept of route guards and provide an example of their usage?
Route guards are interfaces that determine if a route can be activated, deactivated, or have its children activated. They are useful for protecting routes, e.g., requiring authentication. An example is implementing the CanActivate interface with a method returning true or false based on the authentication state.
35. How do you create a child route, and what are the benefits of using nested routes?
Child routes are created by adding a children property to a route definition, which contains an array of routes. Nested routes provide a hierarchical structure, allowing for more organized code and the ability to reuse components with different content based on the active route.
36. What is the purpose of the ActivatedRoute service in Angular?
The ActivatedRoute service is used to access information about the current route, including route parameters, query parameters, and data. It's an essential tool for building dynamic, data-driven components that respond to route changes.
37. How do you handle route resolvers, and when are they useful?
Route resolvers are classes implementing the Resolve interface, used to fetch data before navigating to a route. They are useful when a component relies on data that must be retrieved asynchronously, ensuring the data is available before rendering the component. Resolved data can be accessed via the data property of the ActivatedRoute service.
38. What is the difference between a pathMatch value of 'full' and 'prefix' in route configurations?
In route configurations, pathMatch specifies how the router should match the URL. A value of 'full' means the entire URL must match the route's path, while 'prefix' matches if the URL starts with the route's path. 'full' is commonly used with empty paths and redirect routes, while 'prefix' is the default value.
39. How do you create and apply a custom route animation in Angular?
Custom route animations in Angular are created using the Angular Animations module. First, define the animation in a reusable trigger() function with state() and transition() calls. Then, apply the animation by adding the [@triggerName] syntax to the router outlet in the template. Finally, configure the data property in the route definition to include the desired animation state.
40. Can you explain lazy loading in Angular, and what are its benefits?
Lazy loading in Angular refers to the practice of loading feature modules only when they are needed, rather than during the initial app loading. This reduces the initial bundle size, leading to faster load times and improved performance. To implement lazy loading, use the loadChildren property in the route definition, providing a function that returns an import statement for the desired module.

Template-driven and Reactive Forms
This section of Angular interview questions and answers is related to template-driven and reactive forms. We'll walk through the key concepts and differences between these two form approaches in Angular and cover topics such as creating and validating forms, managing form controls and groups, understanding the different form classes, dynamically adding or removing form controls, implementing custom validators, handling form submission and reset, utilizing async validators, and handling cross-field validation.
41. What are the main differences between template-driven and reactive forms in Angular?
The main differences between template-driven and reactive forms in Angular are as follows:
1. Template-driven forms focus on simplicity and are suitable for simple scenarios. They rely on directives in the HTML template to create and manipulate form controls, while reactive forms are more scalable and emphasize a clear separation between the UI and the form logic, making them ideal for complex scenarios.
2. Template-driven forms use two-way data binding and NgModel to keep form controls and data in sync, whereas reactive forms use an explicit, immutable approach with FormControl instances to manage the state and validation of form controls.
3. Validation in template-driven forms is achieved through HTML5 validation attributes, while reactive forms use validator functions in the component class.
42. How do you create and validate a template-driven form, and what are the key directives used?
To create and validate a template-driven form:
1. Import the FormsModule into your AppModule.
2. Add the ngModel directive to bind form controls to data properties.
3. Use the name attribute to register the form control with the parent form.
4. Add the required, minlength, maxlength, pattern, or other HTML5 validation attributes.
5. Use the ngForm, ngModelGroup, and ngModel directives for form and form control state.
6. To access the form's state and handle submission, use the ngSubmit event and a template reference variable.
43. How do you create and validate a reactive form, and what are the main methods used to manage form controls and groups?
To create and validate a reactive form:
1. Import the ReactiveFormsModule into your AppModule.
2. In the component, instantiate a FormGroup instance with FormControl instances for each form control, along with their initial values and validation rules.
3. In the template, use the formGroup, formGroupName, and formControlName directives to bind the FormGroup instance and its FormControl instances to the form and its controls.
4. Use the Validators class to apply built-in validation rules, or create custom validator functions.
5. To handle form submission and access form data, use the (ngSubmit) event.
44. Can you explain the difference between FormControl, FormGroup, and FormArray in reactive forms?
In reactive forms:
a. FormControl represents a single form control and its associated value, validation state, and interaction status.
b. FormGroup is a collection of FormControl instances, which are logically grouped together, enabling aggregate validation and state tracking.
c. FormArray is similar to FormGroup, but it represents an array of FormControl instances, allowing for dynamic addition and removal of controls.
45. How do you dynamically add or remove form controls in a reactive form?
To dynamically add or remove form controls in a reactive form:
1. Use the FormArray class for the collection of form controls.
2. To add a new control, call the push method on the FormArray instance, passing in a new FormControl instance.
3. To remove a control, call the removeAt method on the FormArray instance, passing in the index of the control to remove.
46. How do you implement custom validators in both template-driven and reactive forms?
To implement custom validators in both template-driven and reactive forms:
In template-driven forms, create a custom directive that implements the Validator interface, and then use this directive as an attribute on the form control element.
In reactive forms, create a custom validator function that takes a FormControl instance as input and returns an error object or null. Attach this function to the FormControl instance when it is instantiated.
47. What is the purpose of the updateOn property in reactive forms, and when should you use it?
The updateOn property in reactive forms allows you to control when the form control's value and validation state are updated. By default, it's set to 'change', updating the value and validation state on every input event. You can set it to 'blur' to update only when the control loses focus, or 'submit' to update when the form is submitted. Use this property to optimize performance in large or complex forms.
48. How do you handle form submission and reset in both template-driven and reactive forms?
In both Template-Driven and Reactive Forms, form submission and reset can be handled through event binding and method calls.
A. Template-Driven Forms
Form Submission: Bind the (ngSubmit) event to a method in your component, e.g., <form (ngSubmit)="onSubmit()" #myForm="ngForm">. In the component, define the onSubmit() method to process the form data.
Form Reset: Call the reset() method on the NgForm instance. In the template, bind a click event to the reset method, e.g., <button (click)="myForm.reset()">Reset</button>.
B. Reactive Forms
Form Submission: Bind the (ngSubmit) event to a method in your component, e.g., <form [formGroup]="myForm" (ngSubmit)="onSubmit()">. In the component, define the onSubmit() method to process the form data from the FormGroup instance.
Form Reset: Call the reset() method on the FormGroup instance, e.g., in the component, this.myForm.reset().
49. Can you explain how to use the async validator in reactive forms?
To use an async validator in Reactive Forms, you need to create a custom validator function that returns a Promise or an Observable. The async validator should resolve with null if validation passes, or an error object if it fails.

To use the async validator, add it as the third argument in the form control creation, after the synchronous validators:

50. How do you handle cross-field validation in reactive forms?
To handle cross-field validation in Reactive Forms, you can create a custom validator function that works at the FormGroup level. This allows you to access multiple form controls and compare their values.
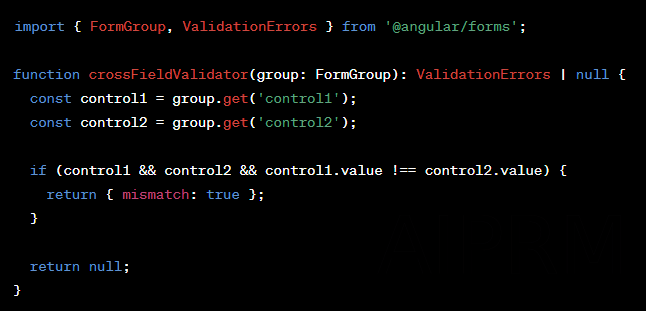
Apply the validator to the FormGroup using the setValidators() method or directly in the FormGroup creation:

Directives
51. What are the types of directives in Angular?
A directive in Angular is a class that manipulates or extends the behavior of the DOM elements. There are three main types of directives:
Component Directives: They are essentially directives with a template, used to create reusable UI components.
Attribute Directives: They alter the behavior or appearance of an element, component, or another directive.
Structural Directives: They manipulate the DOM layout by adding, removing, or modifying elements.
52. Can you explain the difference between structural and attribute directives?
Structural Directives manipulate the DOM structure by adding or removing elements, while Attribute Directives alter the behavior or appearance of an element or another directive.
Structural directives are prefixed with an asterisk (*) while attribute directives are not.
53. How do you create a custom attribute directive, and what are the key decorators involved?
To create a custom attribute directive, first import the necessary decorators and classes from the @angular/core module. The key decorators involved are @Directive and @Input.
The ElementRef and Renderer2 classes are often used to manipulate the DOM element.
Define the directive class, apply the @Directive decorator with a selector, and implement the desired functionality within the class.
54. How do you create a custom structural directive, and what is the role of the ngTemplateOutlet?
To create a custom structural directive, you need the @Directive decorator, a selector, and the ViewContainerRef and TemplateRef classes.
The role of ngTemplateOutlet is to create an embedded view from a given template and insert it into the view container.
Use the @Input decorator to handle the input expressions and apply the desired behavior to the DOM structure.
55. How do you use Angular's built-in directives such as *ngIf, *ngFor, and [ngSwitch]?
To use Angular's built-in directives, place them on the desired elements in your template:
*ngIf: Conditionally adds or removes an element based on the expression's truthiness: <div *ngIf="condition">Content</div>
*ngFor: Repeats a DOM element for each item in an array: <div *ngFor="let item of items">{{item}}</div>
[ngSwitch]: Conditionally displays content based on the expression's value: <div [ngSwitch]="expression"><div *ngSwitchCase="'value1'">Value 1</div><div *ngSwitchDefault>Default Value</div></div>
56. Can you provide an example of using the Renderer2 service to manipulate the DOM in a directive?
Here's an example of using Renderer2 in a custom attribute directive:
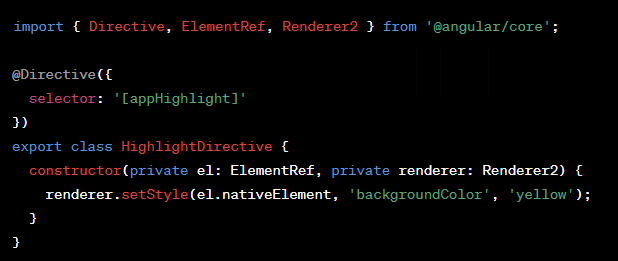
This directive sets the background color of the host element to yellow using the Renderer2 service.
57. How do you create a custom two-way data binding using a directive?
To create a custom two-way data binding using a directive, use the combination of @Input and @Output decorators along with EventEmitter.
In your directive, define an input property, an output property with the same name but suffixed with "Change", and emit an event with the new value when the binding should be updated.
58. What are the key lifecycle hooks for a directive, and when are they called?
The key lifecycle hooks for a directive are:
a. ngOnChanges: Called whenever one or more data-bound input properties change.
b. ngOnInit: Called once the directive is initialized, after the first ngOnChanges call.
c. ngDoCheck: Called during every change detection run.
d. ngOnDestroy: Called just before Angular destroys the directive.
59. How do you handle host binding and host listeners in custom directives?
To handle host binding and host listeners in custom directives, use the @HostBinding and @HostListener decorators.
@HostBinding is used to bind a property of the directive to a property of the host element, while @HostListener listens for specific events on the host element and calls the specified method when the event is triggered.
60. Can you explain the concept of directive priorities and how they affect directive execution order?
Directive priorities in Angular refer to the order in which directives are applied to an element. Directives with higher priorities are executed before those with lower priorities.
By default, Angular applies directives in the order they appear in the template.
However, if multiple directives have conflicting behavior, you can use directive priorities to control their execution order.
Google's stamp of approval
Angular is backed and actively maintained by Google, which gives developers confidence in the framework's long-term support and viability. Angular is used extensively in many Google products, such as Google AdWords, Google Cloud Platform, and Google Analytics, showcasing its robustness and scalability
Observables and RxJS
If you're preparing for an Angular interview, understanding observables and RxJS is crucial, as they play a significant role in Angular development. We'll refresh our knowledge on topics such as creating and subscribing to observables, using RxJS operators, handling errors and retries, and differentiating between hot and cold observables, the benefits of using the async pipe in Angular templates, and the purpose of Subjects in RxJS.
We'll also talk about how BehaviorSubject, ReplaySubject, AsyncSubject can be utilized in Angular applications, and about the combineLatest and forkJoin operators, providing practical examples of their usage within an Angular context.
Let's go on with these Angular interview questions and answers!
61. What is an observable, and how does it differ from a promise?
An observable is a data stream that can emit multiple values over time, allowing subscribers to react to each emitted value. Observables are the core concept in the Reactive Extensions for JavaScript (RxJS) library.
Promises, on the other hand, represent a single asynchronous operation that either resolves to a value or fails with an error.
The main differences between observables and promises are that observables can emit multiple values, can be canceled, and support various data transformation operators.
62. How do observables relate to the Angular framework?
Observables are heavily integrated with the Angular framework, particularly in handling asynchronous operations. Angular uses observables for event handling, form handling, HTTP requests, and more.
The framework leverages the power of RxJS to manage complex asynchronous workflows, providing a consistent and powerful way to handle data streams.
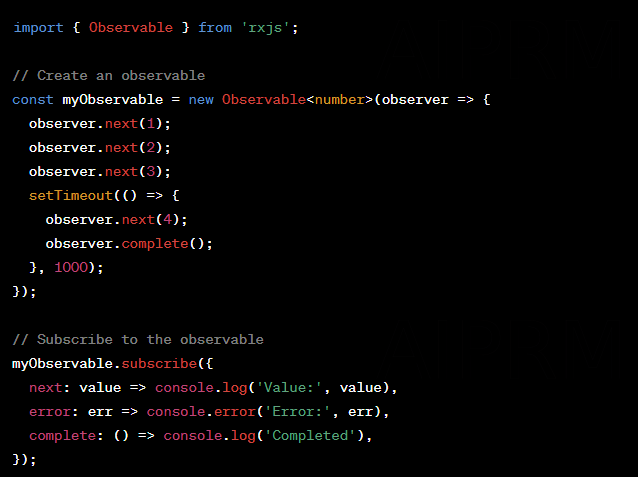
63. Can you provide an example of creating and subscribing to an observable in Angular?
Example of creating and subscribing to an observable in Angular:
64. What are the main RxJS operators, and when should you use them?
RxJS provides a wide range of operators to transform, filter, and manipulate data streams. Some of the main operators include:
a. map: Transforms each emitted value using a given projection function.
b. filter: Filters the emitted values based on a predicate function.
c. mergeMap: Maps each value to an observable, then flattens and merges the resulting observables.
d. concatMap: Similar to mergeMap, but maintains the order of the inner observables.
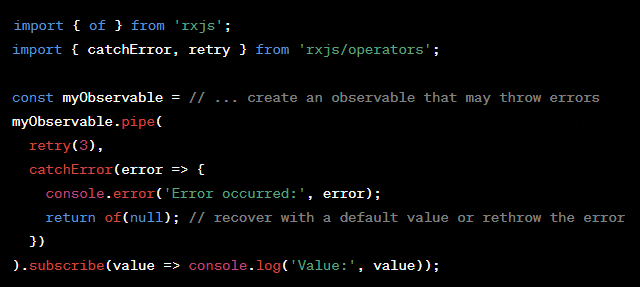
e. catchError: Handles errors in the observable stream and allows for recovery or rethrowing.
f. retry: Resubscribes to the source observable if an error occurs, retrying a specified number of times.
g. debounceTime: Emits the latest value after a specified time delay, useful for reducing rapid emissions.
The appropriate operator depends on the specific use case and the desired behavior of the data stream.
65. How do you handle error handling and retries with observables and RxJS?
Error handling and retries in observables can be achieved using the catchError and retry operators. For example:
66. Can you explain the difference between hot and cold observables?
Hot observables are active and producing values even before a subscription is made, while cold observables start producing values only when a subscription is made.
In hot observables, multiple subscribers share the same data stream and receive the same values, while in cold observables, each subscriber receives a separate copy of the data stream with unique values.
67. How do you use the async pipe in Angular templates, and what are its benefits?
The async pipe is an Angular utility that simplifies the process of subscribing and unsubscribing from observables or promises within Angular templates.
It automatically subscribes to the observable and updates the view whenever new values are emitted. To use the async pipe, simply add | async to an observable or promise in your Angular template.
Benefits of the async pipe include:
1. Reducing boilerplate code by handling subscriptions and unsubscriptions automatically.
2. Preventing memory leaks by automatically unsubscribing when the component is destroyed.
3. Simplifying template code and improving readability.
68. What is the purpose of Subjects in RxJS, and how do they differ from regular observables?
Subjects are a special type of observable that also implement the observer pattern, allowing them to both emit and subscribe to values.
Unlike regular observables, subjects can have multiple subscribers and can be used to multicast values to all subscribers simultaneously.
There are four main types of subjects in RxJS:
1. Regular Subject: Broadcasts new values to all subscribers.
2. BehaviorSubject: Stores the latest emitted value and provides it to new subscribers.
3. ReplaySubject: Stores a specified number of past emitted values and provides them to new subscribers.
4. AsyncSubject: Emits only the last value and completes when the source observable completes.
69. How do you use BehaviorSubject, ReplaySubject, and AsyncSubject in Angular applications?
BehaviorSubject, ReplaySubject, and AsyncSubject are specialized types of Subjects in RxJS, which are both an Observable and an Observer.
They are used to manage state and handle data streams in Angular applications. Let me explain each of them and how to use them:
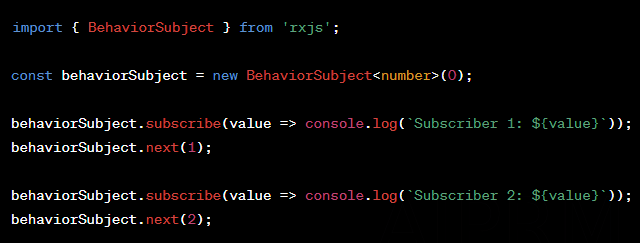
BehaviorSubject
A BehaviorSubject holds the current value and emits it to new subscribers as the initial value. It also emits new values to all existing subscribers when updated. To use a BehaviorSubject, first, import it from the rxjs library, then create a new instance with an initial value. Subscribers can access the current value using the getValue() method.
ReplaySubject
A ReplaySubject records a specified number of emitted values and replays them to new subscribers. To use a ReplaySubject, import it from the rxjs library, create a new instance with a buffer size, and then subscribe to it.
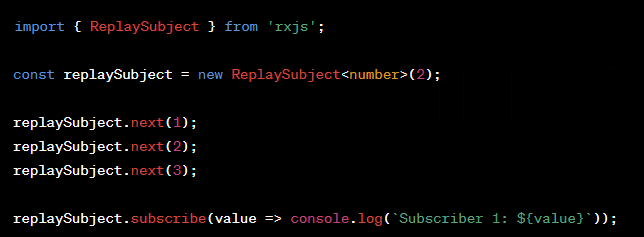
AsyncSubject
An AsyncSubject emits the last value to its subscribers only when it completes. This is useful when you need to emit the final value of a computation or an HTTP request. To use an AsyncSubject, import it from the rxjs library, create a new instance, subscribe to it, and call the complete() method after emitting values.
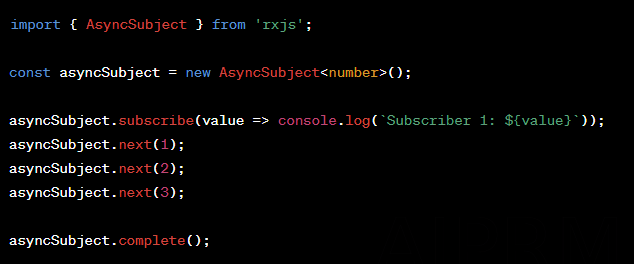
70. Can you provide an example of using the combineLatest or forkJoin operators in Angular?
combineLatest and forkJoin are RxJS operators that can be used in Angular applications to combine multiple Observables. Here's an example of each:
combineLatest
This operator combines the latest values emitted by multiple Observables and emits an array containing the latest values. It's useful when you need to react to changes in multiple data streams.

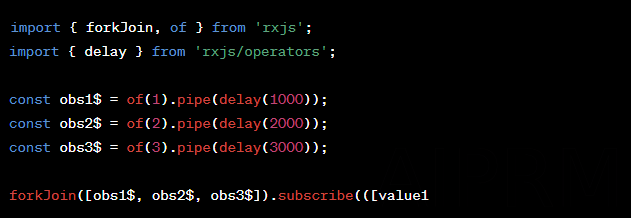
forkJoin
This operator waits for all input Observables to complete and emits the last emitted value from each as an array. It's useful when you need to wait for multiple HTTP requests or asynchronous tasks to finish.
typescript
Change Detection and Performance Optimization
71. How does Angular's change detection mechanism work, and what triggers it?
Angular's change detection mechanism works by periodically checking the state of components to detect any changes in their properties, inputs, and outputs.
The mechanism is triggered by various events such as user input, HTTP requests, timers, and component lifecycle hooks.
When a change is detected, Angular updates the DOM and re-renders the affected components.
72. Can you provide an explanation of the distinction between the default and OnPush change detection strategies?
The default change detection strategy in Angular is CheckAlways, which checks for changes in every component tree during each change detection cycle.
On the other hand, the OnPush strategy only checks components when their input properties change, or when an event is emitted from a child component.
This makes OnPush more efficient, as it reduces the number of change detection cycles.
73. How do you optimize change detection in Angular using the OnPush strategy and immutability?
To optimize change detection using the OnPush strategy and immutability, follow these steps:
1. Set the change detection strategy for a component to OnPush using the changeDetection property in the @Component decorator.
2. Ensure that input properties are immutable. When updating a property, create a new object rather than modifying the existing one.
3. Use async pipe when dealing with observables, as it automatically marks components for change detection when values are emitted.
74. What is the role of the trackBy function in *ngFor loops, and how does it improve performance?
The trackBy function in *ngFor loops is used to provide a unique identifier for each item in a collection.
This helps Angular to efficiently track changes and minimize DOM manipulation when items are added, removed, or reordered.
By reducing the number of DOM updates, trackBy improves the performance of rendering large lists.
75. How do you implement lazy loading in Angular, and what are its benefits?
To implement lazy loading in Angular, follow these steps:
1. Create separate feature modules for different parts of the application.
2. Use the loadChildren property in the routing configuration to specify the module that should be loaded lazily.
3. Ensure that the Angular CLI is configured to build the application with lazy loading enabled.
The benefits of lazy loading include reduced initial bundle size, faster application startup, and improved overall performance by loading only the necessary code for the current route.
76. Can you provide an example of using the Angular's built-in PurePipe for performance optimization?
Here's an example of using Angular's built-in PurePipe for performance optimization:
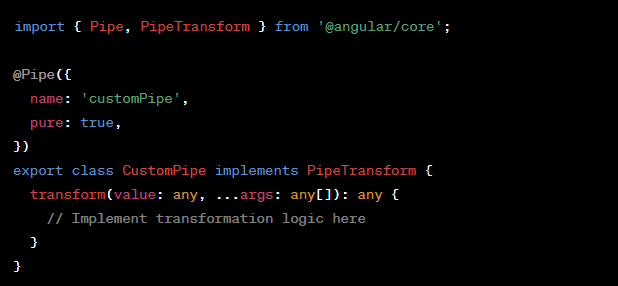
Pure pipes only re-evaluate when their input values change, which can improve performance by reducing the number of function calls during change detection.
77. How do you use the ngZone.runOutsideAngular method to optimize performance in Angular applications?
To use the ngZone.runOutsideAngular method for performance optimization, follow these steps:
1. Inject the NgZone service into your component or service.
2. Wrap the code that should run outside Angular's change detection in the ngZone.runOutsideAngular method.
This technique can improve performance by reducing the number of change detection cycles triggered by events or callbacks that don't affect the application's state.
78. What are the main techniques for reducing the bundle size of an Angular application?
The main techniques for reducing the bundle size of an Angular application are:
1. Lazy loading of feature modules.
2. Using the AOT compiler.
3. Using the build optimizer provided by the Angular CLI.
4. Removing unused code and libraries.
5. Minifying and compressing assets.
79. How do you profile and debug performance issues in Angular applications?
Profiling and debugging performance issues in Angular applications:
1. Use the browser's built-in performance profiling tools, such as Chrome DevTools, to identify slow JavaScript execution, rendering bottlenecks, and memory leaks.
2. Monitor Angular's change detection cycles with tools like Angular DevTools or Augury to identify unnecessary or frequent change detection runs.
3. Use the trackBy function in *ngFor directives to avoid unnecessary DOM manipulations and reduce rendering time.
4. Utilize web performance APIs, such as window.performance, to gather performance metrics and identify bottlenecks in your application.
5. Analyze your application's bundle size with tools like Webpack Bundle Analyzer or Source Map Explorer to find opportunities for optimization.
80. Can you explain the concept of ahead-of-time (AOT) compilation and its impact on Angular application performance?
Explaining the concept of ahead-of-time (AOT) compilation and its impact on Angular application performance:
Ahead-of-time (AOT) compilation is a feature in Angular that compiles the application's templates, components, and metadata during the build process instead of at runtime in the browser. This has several benefits for performance:
1. Faster initial load time: Since templates are precompiled, there is less work for the browser to do when loading the application.
2. Smaller bundle size: The Angular compiler and other unused parts of the framework are not included in the final bundle, reducing its size.
3. Better security: AOT compilation eliminates the need for evaluating potentially malicious code at runtime.
4. Improved error detection: Template errors can be caught during the build process, making it easier to identify and fix issues before deploying the application.
To enable AOT compilation, use the --aot flag with the Angular CLI when building your application, or set the aot option to true
Ivy Renderer
With the release of Angular 9, the Angular team introduced the Ivy Renderer, which is the framework's latest compilation and rendering pipeline. Ivy significantly reduces bundle size, improves build times, and enables faster application rendering. The adoption of Ivy marks a significant milestone in Angular's evolution and showcases the team's dedication to performance optimization.
Testing
Testing plays a crucial role in ensuring the quality and reliability of Angular projects. By thoroughly testing our code, we can identify and fix issues early, resulting in more stable applications. Throughout this discussion, we'll talk about the importance of testing, different types of tests, setting up unit testing with Jasmine and Karma, testing Angular components with TestBed and ComponentFixture, testing services and handling HTTP requests, understanding the differences between TestBed and TestModule, testing components with dependencies, examining input properties and output events, testing Angular directives, setting up end-to-end (E2E) testing using Protractor, and finally, learning best practices for writing maintainable and reliable tests in Angular applications.
Let's dive in and explore these Angular interview questions and answers.
81. What is the importance of testing in Angular applications, and what are the main types of tests?
The importance of testing in Angular applications is to ensure the application's functionality, maintainability, and reliability. Testing helps catch bugs early, reduces development time, and improves code quality. The main types of tests in Angular are:
Unit tests: Test individual components, services, and directives in isolation.
Integration tests: Test the interaction between different components and services.
End-to-end tests (E2E): Test the entire application's behavior from the user's perspective.
82. How do you set up unit testing in Angular using Jasmine and Karma?
To set up unit testing in Angular using Jasmine and Karma, follow these steps:
1. Ensure you have Angular CLI installed (npm install -g @angular/cli).
2. Create a new Angular project using the CLI (ng new my-app).
3. Angular CLI sets up Jasmine and Karma by default, so navigate to the karma.conf.js file to configure Karma settings and src/test.ts to import required Jasmine testing utilities.
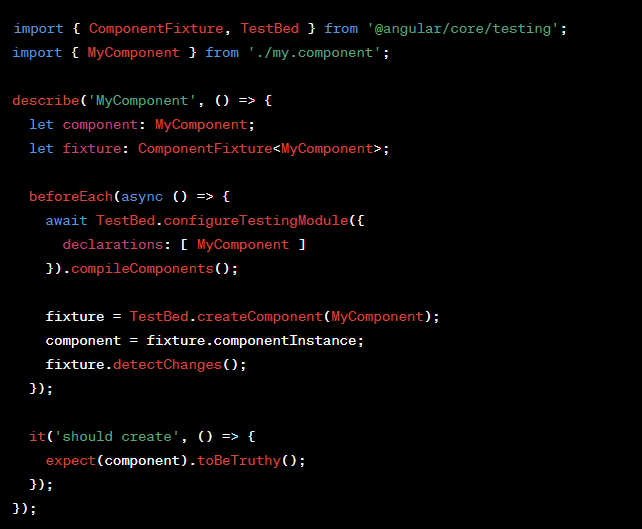
83. Can you provide an example of testing an Angular component with TestBed and ComponentFixture?
Here's an example of testing an Angular component with TestBed and ComponentFixture:
84. How do you test Angular services, and what are the key considerations for testing HTTP requests?
To test Angular services, use TestBed to inject the service and mock dependencies like HTTP requests. Key considerations for testing HTTP requests include:
1. Use HttpClientTestingModule and HttpTestingController to mock HTTP requests and responses.
2. Test for correct request URLs, methods, and headers.
3. Test how the service handles success and error responses.
85. What are the main differences between TestBed and TestModule in Angular testing?
The main differences between TestBed and TestModule in Angular testing are:
TestBed: A dynamic testing module used for configuring and creating test environments. TestBed.configureTestingModule() is used to set up the testing module with required dependencies, components, services, and directives.
TestModule: There is no specific TestModule in Angular. However, Angular allows the creation of custom test modules, which are NgModule classes with a specific set of providers, declarations, and imports for testing purposes.
86. How do you test components with dependencies, such as other components or services?
To test components with dependencies:
1. Use TestBed.configureTestingModule() to declare the dependencies and provide mock versions when needed.
2. For services, use TestBed.inject() to inject the service instance and spyOn() to monitor or override methods.
3. For child components, use ComponentFixture to access their instances and test their interactions.
87. Can you explain how to test Angular components with input properties and output events?
To test Angular components with input properties and output events:
Input properties: Set the input property value on the component instance and call fixture.detectChanges(). Then, assert the expected behavior or DOM updates.
Output events: Subscribe to the output event emitter, set up a spy function to capture emitted values, and then trigger the event in the component by interacting with the DOM or calling methods directly.
88. How do you test Angular directives, and what are the key considerations for testing custom directives?
To test Angular directives:
1. Create a test host component with the directive applied.
2. Use TestBed to configure the test environment and create a ComponentFixture for the test host component.
3. Key considerations for testing custom directives include asserting expected behavior, DOM updates, and interactions with other components or services.
89. How do you set up end-to-end (E2E) testing in Angular using Protractor?
1. Ensure that you have Node.js and npm installed in your system. If not, you can download and install Node.js from the official website which will also install npm.
2. Install Protractor globally on your machine by running this command in your terminal.
3. Update the WebDriver Manager. It's a helper tool to get an instance of a Selenium Server running.
4. You can set up a Protractor configuration file. This file will be used by Protractor to execute the tests.
5. Run your tests.
90. Can you provide some best practices for writing maintainable and reliable tests in Angular applications?
Best practices for writing maintainable and reliable tests in Angular applications:
1. Test behavior, not implementation: Focus on testing the expected behavior of your components, directives, and services, rather than the specific implementation details.
2. Keep tests DRY: Avoid duplicating code by creating utility functions or using beforeEach() to handle common setup tasks.
3. Use clear and descriptive test descriptions: Write test descriptions that explain the purpose and expected outcome of each test.
4. Separate unit and integration tests: Use isolated unit tests for testing individual pieces of functionality and integration tests for testing the interaction between components, directives, and services.
5. Mock dependencies: When testing a component or service, mock its dependencies to isolate the unit under test and control the testing environment.
6. Keep test data simple: Use simple and easy-to-understand test data, avoiding complex structures when not necessary.
7. Test edge cases and error scenarios: Ensure that your tests cover edge cases and error scenarios to increase the overall reliability of your application.
8. Maintain a clean test suite: Regularly review and refactor your tests to keep them up-to-date and avoid testing deprecated functionality.
State Management
91. What is state management, and why is it important in Angular applications?
State management refers to the process of maintaining the application's state, which includes data, UI state, and user interactions.
In Angular applications, it's important because it enables efficient data flow, promotes scalability, and simplifies debugging.
Managing state effectively helps maintain the application's performance and reduces complexity as it grows.
92. Can you explain the concept of the Redux pattern and how it can be applied to Angular applications?
The Redux pattern is a popular state management approach based on the principles of immutability, unidirectional data flow, and the use of a single store for global state.
In Angular applications, Redux can be implemented using libraries like NgRx. With Redux, the application state is centralized and maintained by reducers, which receive actions that describe changes in the state.
This pattern makes it easier to trace changes, debug, and test the application.
93. What is the purpose of the NgRx library, and how does it relate to Redux?
The NgRx library is an Angular-specific implementation of the Redux pattern, providing a robust and reactive state management solution.
It includes core concepts like actions, reducers, and selectors, and follows the same principles as Redux.
NgRx leverages RxJS, a reactive programming library, to handle asynchronous data streams and provide a more powerful way to manage state in Angular applications.
94. How do you set up state management using NgRx in an Angular application?
To set up state management using NgRx in an Angular application, follow these steps:
1. Install the required packages: @ngrx/store, @ngrx/effects, and @ngrx/store-devtools.
2. Create actions that represent state changes.
3. Implement reducers to handle actions and update the state.
4. Set up a store that holds the global state.
5. Use selectors to retrieve state slices.
6. Handle side effects using effects.
7. Optionally, configure StoreDevtoolsModule for debugging.
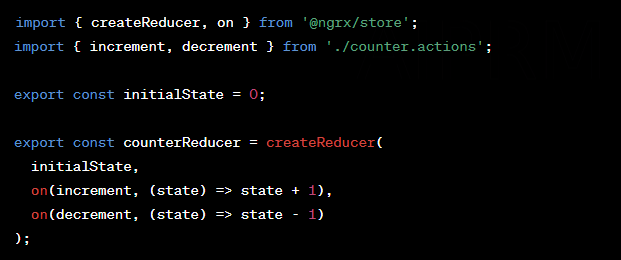
95. Can you provide an example of creating actions, reducers, and selectors in NgRx?
Here's an example of creating actions, reducers, and selectors in NgRx:
Actions

Reducer
Selector

96. What is the role of Effects in NgRx, and how do they handle side effects?
Effects in NgRx handle side effects, such as asynchronous API calls, and manage the dispatch of actions based on external events.
They listen for specific actions, perform side effects, and then dispatch new actions as needed.
Effects ensure that the reducers remain pure and only handle state updates, while the side effects are managed separately.
97. How do you use the StoreDevtoolsModule in Angular for debugging state management?
To use the StoreDevtoolsModule in Angular for debugging state management, follow these steps:
1. Install the @ngrx/store-devtools package.
2. Import the StoreDevtoolsModule in your AppModule and call the instrument() method.
3. Install the Redux DevTools browser extension.
4. Open the Redux DevTools extension in your browser to view and debug your application's state.
98. Can you provide an example of using the ngrx/data package to simplify data management in Angular applications?
Using the ngrx/data package simplifies data management in Angular applications by reducing boilerplate code for common CRUD operations.
1. Install the @ngrx/data package.
2. Import the EntityDataModule and configure it in your AppModule.
3. Create an entity interface and service, for example, for a 'Product'.
4. Use the ProductService to perform CRUD operations on the Product entity.
99. How does the Akita state management library differ from NgRx, and when might you choose to use it?
Akita is an alternative state management library for Angular applications. Unlike NgRx, it is not based on the Redux pattern and does not rely on actions, reducers, and effects.
Akita uses stores and queries to manage state, and it is generally simpler and more flexible than NgRx.
You might choose Akita when you need a lightweight state management solution with less boilerplate code and a less steep learning curve.
100. What are some best practices for organizing and structuring state management code in Angular applications?
Some best practices for organizing and structuring state management code in Angular applications include:
1. Organize state-related code into feature modules to keep the application modular and maintainable.
2. Use action creators to define actions, making them more readable and maintainable.
3. Group related actions, reducers, selectors, and effects into a single folder.
4. Keep reducers simple and focused on state updates, offloading side effects and complex logic to effects or services.
5. Use selectors to access state slices, as they provide a level of abstraction and can improve performance through memoization.
6. Establish naming conventions for actions, reducers, and selectors to make the codebase consistent and easy to understand.
Angular CLI
101. What is the Angular CLI, and what are its main features and benefits?
The Angular CLI (Command Line Interface) is a powerful tool that simplifies the development process for Angular applications. Its main features and benefits include:
1. Streamlining project setup and configuration.
2. Generating components, services, directives, and pipes.
3. Simplifying the build and deployment process.
4. Facilitating testing and debugging.
5. Managing multiple environments.
6. Extending functionality through schematics and custom configurations.
102. How do you create a new Angular project using the Angular CLI?
To create a new Angular project using the Angular CLI, open a terminal and run the following command:
Replace "my-project" with the desired name for your project. The CLI will prompt you to choose options such as routing and the stylesheet format, then create a new project directory with the specified configurations.
103. Can you provide an example of generating components, services, directives, and pipes using the Angular CLI?
Generating components, services, directives, and pipes using the Angular CLI:
Component: ng generate component my-component
Service: ng generate service my-service
Directive: ng generate directive my-directive
Pipe: ng generate pipe my-pipe
Replace "my-component", "my-service", "my-directive", and "my-pipe" with the desired names.
104. How do you use the Angular CLI to build and serve an Angular application in development and production environments?
To build and serve an Angular application using the Angular CLI:
Development environment: Run ng serve. This command starts a development server, opens the application in your default web browser, and automatically refreshes the page whenever you make changes to the source code.
Production environment: Run ng build --prod. This command creates a production-optimized build in the "dist" folder, ready for deployment.
105. What is the purpose of the angular.json configuration file, and how can you customize it to suit your project requirements?
The angular.json configuration file is the central configuration file for Angular CLI projects. It manages settings such as:
1. Project structure.
2. Build and serve options.
3. Test configurations.
4. Schematics and third-party tool integrations.
You can customize angular.json to suit your project requirements by modifying properties like "assets", "styles", and "scripts" or configuring custom builders and schematics.
106. How do you create and manage multiple environments using the Angular CLI?
To create and manage multiple environments using the Angular CLI:
1. Create environment-specific configuration files in the "src/environments" folder (e.g., environment.prod.ts and environment.staging.ts).
2. Update the build configurations in angular.json to include the new environments.
3. Use the --configuration flag when building or serving to specify the desired environment (e.g., ng serve --configuration=staging).
107. Can you explain how to use the Angular CLI to run unit tests and end-to-end tests?
The Angular CLI provides built-in support for running both unit tests and end-to-end (E2E) tests in your application.
To run unit tests, use the following command: ng.test.
This command will build your application, start the Karma test runner, and execute the unit tests defined in the *.spec.ts files. The test results will be displayed in the terminal.
To run end-to-end tests, use the following command: ng.e2e.
This command will build your application, start the development server, and launch the Protractor test runner to execute the E2E tests defined in the *.e2e-spec.ts files. The test results will be displayed in the terminal.
108. How do you configure the Angular CLI to use a custom Webpack configuration?
Configuring Angular CLI to use a custom Webpack configuration:
To use a custom Webpack configuration with Angular CLI, you can use the @angular-builders/custom-webpack package. First, install the package as a development dependency:

Next, update your angular.json file to use the custom Webpack builder. Replace the default builder for your application's build and serve targets with @angular-builders/custom-webpack:browser and @angular-builders/custom-webpack:dev-server respectively.
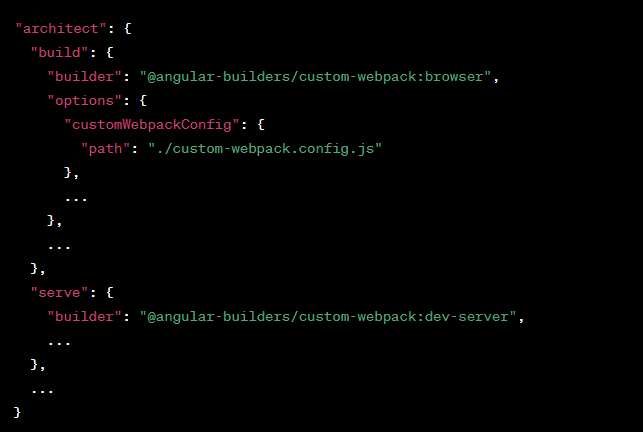
Create a custom-webpack.config.js file in the root of your project and define your custom Webpack configuration. The custom configuration will be merged with the default Angular CLI configuration.
109. What is the purpose of the ng add and ng update commands in the Angular CLI?
The purpose of the ng add and ng update commands in the Angular CLI:
ng add: The ng add command is designed to simplify the process of adding new libraries or packages to an Angular project. It automates the tasks of installing a package, modifying configuration files, and setting up any required dependencies. Using ng add ensures that the added package is compatible with the Angular application and follows best practices for integrating it.
For example, to add Angular Material to your project, you can run the following command:
ng update: The ng update command helps developers to keep their Angular applications up to date with the latest version of Angular and other associated packages. This command updates the packages, applies necessary migrations, and fixes breaking changes in a streamlined manner. By using ng update, you ensure that your application follows the latest standards and stays compatible with new releases.
For example, to update Angular core and CLI packages, you can run the following command:

110. How do you use Angular CLI schematics to create custom templates and blueprints?
Angular CLI Schematics are a powerful tool for creating custom templates and blueprints. To use them, follow these steps:
1. Install the Schematics CLI globally.
2. Create a new schematic project.
3. Navigate to the newly created schematic directory.
4. Modify the src/my-custom-schematic/index.ts file to define your custom schematic. You can use the provided Tree and SchematicContext objects to manipulate the file system and generate your templates and blueprints.
5. Build your schematic.
6. To use your custom schematic in an Angular project, link it to the project.
7. Finally, navigate to your Angular project and run command to link the custom schematic.
8. This command will execute the custom schematic, generating files and making changes according to the logic defined in your index.ts file.
Remember to update your custom schematic as needed and rebuild it using npm run build before using it in your Angular project. This ensures that the latest changes are applied when generating files or making modifications to the project.
Best Practices And Coding Standards
111. What is the Angular Style Guide, and why is it important to follow its recommendations?
The Angular Style Guide is a set of official guidelines and recommendations provided by the Angular team to help developers write consistent, maintainable, and scalable code.
Following the style guide ensures that your code adheres to established best practices, which in turn makes it easier to collaborate with other developers, onboard new team members, and maintain code over time.
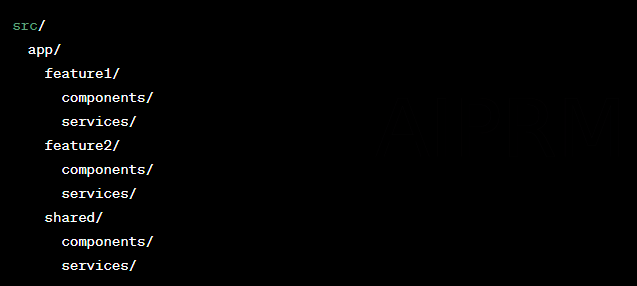
112. Can you provide an example of a best practice for organizing an Angular project structure?
A best practice for organizing an Angular project structure is to follow the modular design pattern. Group related features and components together in dedicated folders, and use a shared folder for commonly used components, services, and utilities. This can be achieved by creating feature modules for each main functionality, and organizing code within these modules into components, services, and other related subfolders.
Example:
113. What are some best practices for writing maintainable and readable Angular components?
Some best practices for writing maintainable and readable Angular components include:
1. Use Single Responsibility Principle: Each component should have a single responsibility and focus on a specific aspect of the application.
2. Keep components small and focused: Small components are easier to understand, test, and maintain.
3. Use clear and descriptive variable, function, and component names.
4. Write comprehensive and self-explanatory comments for complex logic.
5. Utilize TypeScript interfaces and types for better type safety and readability.
6. Encapsulate component styles using Angular's ViewEncapsulation feature.
114. How do you ensure consistency and best practices in Angular projects using code linting tools, such as TSLint or ESLint?
To ensure consistency and best practices in Angular projects using code linting tools, such as TSLint or ESLint, follow these steps:
1. Configure the linting tool with a set of rules that align with your team's coding standards and best practices.
2. Integrate the linting tool into your build process and version control system to automatically run checks on every commit.
3. Use plugins or extensions for your code editor to enable real-time linting feedback during development.
4. Regularly update your linting configuration to stay current with evolving best practices and language features.
115. What are the main benefits of using reactive programming patterns with Angular and RxJS?
The main benefits of using reactive programming patterns with Angular and RxJS include:
1. Improved handling of asynchronous data and complex event-driven logic.
2. Enhanced scalability, maintainability, and testability of your code.
3. Facilitation of state management and data flow within the application.
4. Better performance optimization through built-in mechanisms like debounceTime, distinctUntilChanged, and switchMap.
116. How do you ensure proper error handling and logging in Angular applications?
To ensure proper error handling and logging in Angular applications:
1. Use global error handlers to catch and log unhandled exceptions.
2. Implement HTTP interceptors to handle errors at the HTTP request/response level.
3. Employ centralized error logging services, such as Sentry or LogRocket, for better monitoring and debugging.
4. Utilize custom error classes to provide more context about the error's origin and type.
117. Can you provide an example of a best practice for implementing and organizing CSS in Angular applications?
A best practice for implementing and organizing CSS in Angular applications is to use a component-based styling approach:
1. Utilize Angular's ViewEncapsulation feature to scope styles to individual components.
2. Organize component styles in separate CSS files, co-located with the component's TypeScript and HTML files.
3. Use a shared styles folder for global styles and utility classes.
4. Employ CSS preprocessors like SCSS or LESS for improved maintainability and modularity.
118. What are some key accessibility considerations for Angular developers, and how do you ensure your application is accessible?
Key accessibility considerations for Angular developers include:
1. Using semantic HTML elements and ARIA attributes to provide context and meaning for screen readers.
2. Ensuring keyboard navigation support for all interactive elements.
3. Providing alternative text for images and multimedia content.
4. Implementing proper color contrast and font sizing for better readability.
5. Testing your application with accessibility tools, such as Lighthouse or axe, to identify and address accessibility issues.
119. How do you ensure your Angular application is SEO-friendly and discoverable by search engines?
To ensure your Angular application is SEO-friendly and discoverable by search engines:
1. Use server-side rendering (SSR) with Angular Universal or other SSR solutions to render content on the server, improving indexability by search engines.
2. Implement meta tags and structured data (e.g., JSON-LD) for better content indexing and rich results.
3. Use descriptive and unique titles, headings, and URL structures for each page.
4. Optimize page load times and performance to reduce bounce rates and improve user experience.
5. Leverage Angular's built-in i18n support for internationalization and localization, catering to a global audience.
120. What are some best practices for improving the security of an Angular application, such as handling user authentication and authorization?
Some best practices for improving the security of an Angular application, such as handling user authentication and authorization, include:
1. Implement secure authentication mechanisms, such as OAuth2 or JWT, to protect user credentials and manage access tokens.
2. Use Angular's built-in security features, like HttpInterceptor and DomSanitizer, to mitigate common web vulnerabilities (e.g., XSS, CSRF).
3. Enforce the principle of least privilege by assigning appropriate roles and permissions to users, limiting their access to sensitive resources.
4. Utilize HTTPS to encrypt data transmitted between the client and server, ensuring data confidentiality and integrity.
5. Regularly update your Angular dependencies and third-party libraries to patch any known security vulnerabilities.
6. Conduct thorough security testing, including penetration testing and vulnerability scanning, to identify and remediate potential security issues.
We trust that you discovered the aforementioned Angular interview questions and answers to be valuable! Should you require assistance with IT Staff Augmentation, don't hesitate to reach out to us. Our team of experts will be delighted to aid you in locating the ideal IT professional.
You can find more interview questions and answers about Spring, Hibernate or Spring Boot. Check out our blog site regularly!
To stay updated with our most recent blog articles, we encourage you to connect with us on LinkedIn and Facebook!
